Week 8: The week before final

Stressful? Not at all! I’m just chillin, sweating… crying..


Planning for the final

We had a discussion about how to proceed from here. The lead programmer told me that there is a lot of artifacts they don’t have the time to implement, we have to concentrate on the core features before anything else. So we needed to throw some stuff away, I read through the plans for this week and erased the tasks that we didn’t have time to implement.

Now that the artist don’t have that much to do, we can sit down and polish the last animations, and concentrate on working on setting the contrast to our level, in other words…. Woop wopp this is the sound of the… POLISH (A bit tired maybe?).

The first feedback we got from the Alpha-presentation was that we needed to follow the color scheme and the highlights wasn’t clear enough to the viewer (We aimed to deliver a Noir feeling but with a “Sin City”-style). At the Beta-presentation we were told that we needed to work on contrasting the stuff in our level so I asked for a screenshot for the current level and had Sebastian work on making objects darker/lighter. I can tell that he is starting to get irritated over the fact that he needs to redo them several times, and consult me and Simon, but what can we do that’s the work that needs to be done.

I will try to finish my tasks as fast as possible and then I will have to jump in and help them out with the contrasting.


The tutorial

For this week I teamed up with Herman to complete the tutorial room (first room you start in). We discussed the layout, and wanted to show essential game controls into the first room, movements, attack and interaction, and for the corridor that follows you will need to hide in the locker (as shown in the mock-up below).

ScreenshotAsh
Mock-up for the tutorial room.

I drew out the places we thought of putting our indications so that you can see it properly.

1- First keys shown are the WASD-buttons

2- When you move the sound circles will show, so pressing the space and holding it will change the players movement into sneaking, and the circles will disappear and this wont alert the guards.

3- To move past the door you will have to press “E” to get through, but the red doors can only be opened with a keycard.

4- To get a keycard you will need to take out a guard, to do this you will have to sneak up to the guard and press the left mouse button to attack the target.

5- This blue square represent a locker, press the “E”-button to hide in the locker and “E” once more to exit.


Two important icons

Objective icon, to indicate that this file is of importance I made it glow a bit so that the player would notice it and realize that this is the objective, so I made it glow with the green color (the red would be too much since we use it in shooting, and the vision field of the guards). The green will be visible against the dark background it is put on.

PDAanim
Glowing objective icon


I also made two different colors for the exit sign to test against the level setting, I thought of putting an “exit” text but the team liked these one.


Exitsign
Light exit sign
Exitsigndark
Dark exit sign


All of these icons and pictures in just two days, I am getting better at Photoshop now! 😀

That’s all for this week, for the final week I will need to prepare for the final presentation and I hope that we get the setting for the level done right (I will consult the teachers for this so that we don’t get it wrong)

That’s all for today!
Week 7: Beta Presentation

Right now

I am getting ready for the Beta presentation we are having for tomorrow. The last time I held the presentation I didn’t get that much sleep because I was up crunching with two other members from our group, and I was one of the few who didn’t have a PowerPoint for it.

The critique I got was mostly that we needed to show some pictures of the icons we had; I didn’t think of that. We were going to show how our game worked right on the big screen, and I thought that it should be enough visuals to present. But I have to agree, showing more pictures would’ve been ideal.

This time I have prepared a PowerPoint presentation, and I have played around a bit with the layout, but I think it needs more work (maybe I should add some effects).

Now for the aesthetic side of this blog!

Animation

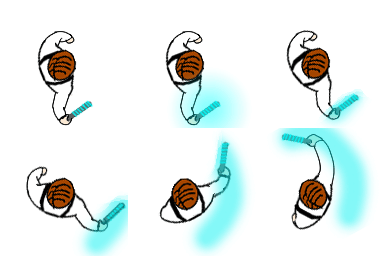
I am working on the ending screens and the baton hit animations that I didn’t present the last time. The animation looks like this:

batongspy
Attack Animation

I needed to redo the swing light, but I don’t have that much more time left to adjust that. Lets save it for the final!

 Victory/Loose Screens

On to the loosing screen I need to make it look like the player is being dragged away after being caught or disabled. And I still need to use the dark setting to represent the same style we are using throughout this project. We haven’t made a lot of  concept art, just a few sketches of the characters.  I chose to use only the silhouettes of our characters, and I asked some friends to help me out so that I can take some pictures, and then I re-edited them in Photoshop using a selection tool to mark out the contours. And on top of that I added the armor and helmet silhouette. Then in the background I put a door where they would move towards.

Loser
Game Over Screen

For the winning screen I use the same method but here I wanted to display the “Spy” exiting the building. Making him run towards the same exit was an obvious choice for me. The same exit makes it clean and If the door is positioned in the middle, the programmers could easily put alternative buttons like “restart” or “quit” to the left side of the door and my indication for the winning or the loosing screen to the right. Placing all the objects like this makes the picture symmetrical and pleasing for the eye to watch.

win
Victory Screen

That’s about it from me this week, folks! Wish me luck!

Week 6: Animations

Enough with the details already!! I got 2 animations done, one is the shooting sequence (both guard and player) And the other one is a strangling sequence. First of I started with a fast sketch just to see if it would look good (I learned from reading Mikaela Mobergs Blog). And yes, it was a helpful strategy! So first I had the sketch then I started to color it.

Here you have the sketch (its not going to be running this fast):

Image

The thing here is that I wanted it to be like a strong blast when he shoots, so therefor I drew a circle before the actual shot. Making the gun “charge” power before shooting away a colored projectile. After I tested the theory and deciding on the length of the animation I started to add some color to it. I used this sketch as a build so that I could divide it into to different animations, one for the player and one for the enemy guard. Here you can see how the refined animation  for the “Spy” (player) looks like (i just noticed that i missed drawing the line on his right arm, oops!):

Image

I then used the same technique to draw the strangling animation. This one was more tricky because I had to think of two movements at the same time, and adding the details together, I wanted to make them both wiggle a lot more but was advised not to (I am being over ambitious I guess 😉 ). This was the most tiring task because I had a bit of a struggle with Photoshop, and this is my first time animating characters, if I moved one thing wrong I had to redo everything! Here you go (wiggle for this fine… Reader):

Image

We discussed the use of the gun before, as you can see, the animation for shooting above is put in a loop. This wont be how it would play out in the game, the thing is that we wont be using more than two charges for the gun (two rounds of fire), otherwise this wont be a stealth game and the player can just run around shooting everything  (we tried it and yes, there is no point in sneaking if you can shoot your way through). So in order to make the game balanced, we give the player limited resources for shooting and you also need to find the gun to be able to use it. There is more, if you choose to use the gun you will emit larger circles of sound and alert other guards and they will start looking for you, in this way you know that you should only use the gun in case of emergency.

For tomorrow I will be needing to finish the last animation, that is hitting with a baton, and color it.

I know that I shouldn’t write this but, I really don’t like animating this haha! Wish me good luck!